
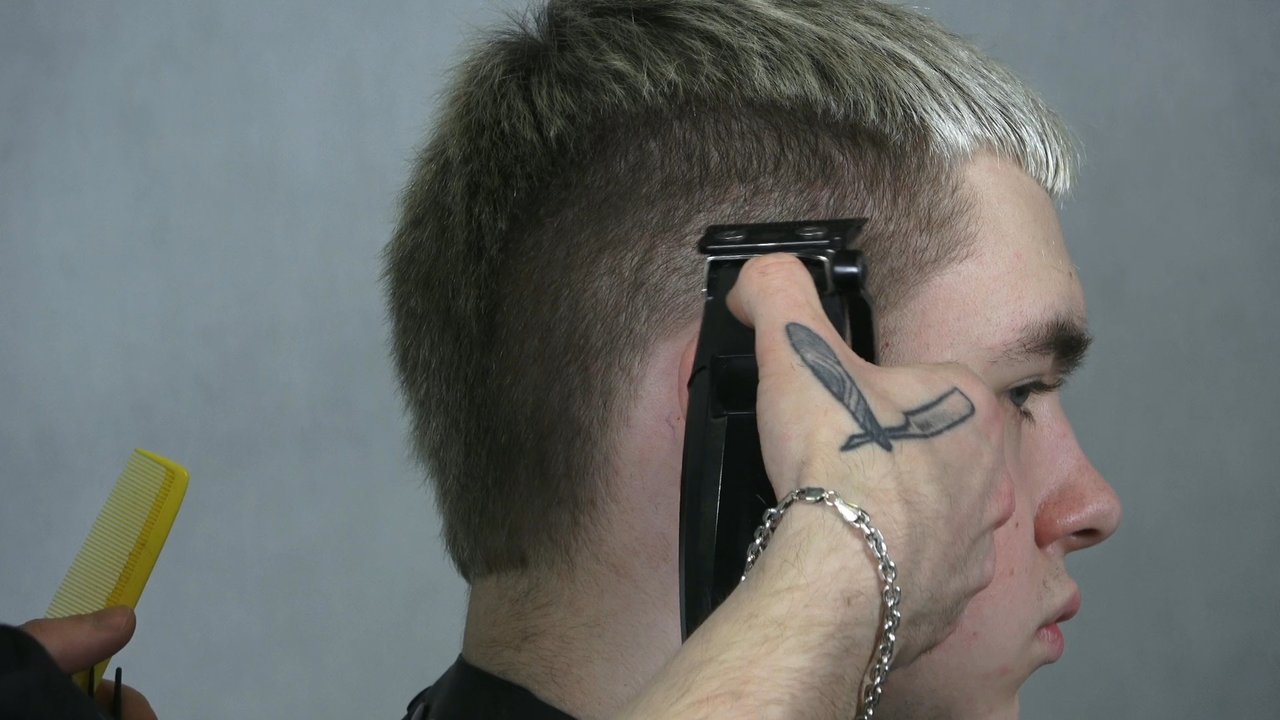
A burst fade doesn't run in a straight line up the head. It radiates around the ear like a burst of light, fading down to the skin exactly where others would leave weight. And on top, instead of a smooth hairstyle, sits a short, textured crop that brings the whole look to life.
Burst Fade Crop is a men's haircut where the clipper fade radiates in an arc around the ear (burst), while the top stays short and choppy in crop style. The fade doesn't climb high on the sides — instead it leaves more hair at the nape and temple, while the crop fringe comes down onto the forehead with clear texture. It's a solution for short hair, where what matters is a clean contrast between the smooth bottom and the textured top. To finish, the top gets plenty of texture from matte paste, giving a relaxed, slightly messy effect — similar to the messy taper, where texture also does most of the work in the finish.
How a Burst Fade Differs From a Regular Fade
A burst fade radiates in an arc around the ear, instead of running in a horizontal line around the whole head. In a classic fade, the weight line runs across the sides and back at roughly the same height. In a burst fade, the fading concentrates at the ear and radiates downward from there, leaving a longer nape. That's why, when planning the cut on this model, Kacper deliberately doesn't go low on the occipital area: the nape is narrow and the sides are heavily built up, so too low a weight line would create a balloon effect.
Kacper Orzechowski adds a crop on top — a short fringe cut with a heavier line and finished for texture. A crop differs from longer fringes in that it isn't combed back — instead it's left on the forehead as a contrast to the smooth fade. Together, burst plus crop create a hairstyle that looks square and muscular from the front, while blending down to the skin around the ear.
Who Is Burst Fade Crop For
Burst Fade Crop works best on short hair, where the occipital area is well built up and the nape is narrow. Kacper adapts the entire shape to the anatomy: he looks at the face shape from the front profile and at what's happening on the sides before he even picks up the scissors. On this model, he removes weight from the crown to give the head a more square shape instead of a round one.
This cut suits people who want a bold contrast and low daily upkeep. The crop on top masks thinner spots, while the burst around the ear visually frames the face. If someone has lightened hair, like the model in the course, the fade reveals an interesting play of shades — lighter ends and darker roots, which Kacper deliberately uses when guiding the line.
How Burst Fade Crop Is Built Step by Step
Burst Fade Crop is built in two stages: first the shape is built with scissors, then it's separated from the fade and worked with clippers in sectors. Kacper starts by analyzing the anatomy and planning where to remove weight and where to leave it. Watch how he reads the model's head and decides on the square silhouette:
Even at this stage, the logic of the whole cut is visible: the occipital area is well built up, so the weight goes down and to the sides, while the crown is left lighter.
Kacper builds the shape on three points of the head and simple partings:
- Sections marked out from three points: the fringe point, the central point, and the hair distribution point.
- Radial sectioning from a single point, with sections like slices of pizza, which creates lightness and shifts weight outward.
- A shift from diagonal sections toward horizontal ones on the sides, since these give more weight than at the back.
- The crop fringe is cut on a heavier line, following the hair's natural fall, without tension (the model has a cowlick that would otherwise distort it).
- Removing weight from the crown by working vertically and horizontally to build a square, muscular shape.
With short, lightened hair, Kacper deliberately avoids going too low on the crown, so a dark patch doesn't appear where everything around it is light. He keeps the hair well moistened throughout, without clipping it up, so the sections don't drift.
Fade: The 13-Millimeter Line and Working Along the Skin
Kacper marks the top fade line with a 13-millimeter clipper guard, because that's exactly the length he left earlier near the scalp, guiding the scissors at a finger's width. This way, the fade connects to the shape quickly, without a visible step. Watch how he marks this top line:
Kacper works along the skin the whole time, never lifting the guard off the curve of the head. Even where the head curves, he follows that curve instead of avoiding it. This guarantees that the weight line runs evenly according to the anatomy, not along some imagined flat plane. The same logic for guiding the weight line comes back in other clipper transitions, for example in the mid fade.
The Zero Line Guided by Light Patches
Kacper doesn't mark the zero line by eye — he follows the light patches that appear on the skin once the fade is exposed. These patches come from the fact that the hair's growth angle changes with the curve of the head: on rounded areas the hair stands up higher, while on flatter areas it lies down at a low angle. These bright spots are his reference point. Watch how he explains this principle:
From a dark point, we can always create a light point, but from a light point, we can't create a dark one.
Kacper Orzechowski
From the height of the patch, Kacper extends the zero line in both directions, parallel to the weight line, as if tracing its arc with a compass. Then he builds the fade in sectors: each sector handles one shade, from light to dark, stacked like the floors of a building. The #3 guard (3 mm) creates the highlight shade, the 1.5 mm guard divides the sector with a motion resembling scraping frost off a windshield in winter, and the #6 (6 mm) and #10 (10 mm) guards move higher into the mid-tone. Each area is split in half and connected with clipper strokes, always looking for the brightest patch as the starting point.
Finishing and Styling Burst Fade Crop
Burst Fade Crop is finished with texturizing shears that connect the shape to the fade, and styled with matte paste for a messy effect. Kacper uses texturizing shears with a very fine blade and works the edge into clusters of hair — the dark clumps that disrupt the smoothness of the transition. The comb runs along the skin, lifting excess hair and showing where to work. He places the line-up at the temple in the most visible spot, where the hair from the front and the middle merges into a dark cluster.
The finishing philosophy is clear: instead of stretching the fade endlessly, Kacper prefers to tighten it — connecting it more firmly to the skin. Stretching it would only open up the head. Finally, he works matte paste in from the roots to get as much air as possible into the crop fringe and highlight the shapes he's created.
It's not quantity that brings us success, it's quality — quantity doesn't matter at all.
Kacper Orzechowski
How Long Burst Fade Crop Lasts
Burst Fade Crop loses its sharpness fastest at the shortest parts of the fade, since that's where regrowth is most visible. The shape on top and the crop fringe itself hold up longer, since Kacper builds them with extra length and texture to spare. The higher the fading starts and the more tightly the fade is connected to the skin, the faster even slight regrowth begins to blur the clean contrast around the ear. This is a cut that lives on the precision of its lower section, so regular touch-ups on the sides keep the burst effect intact.
If your fade keeps opening up, or dark clumps remain along the zero line, it comes down to reading the patches and working in sectors. Kacper Orzechowski shows the entire cut step by step in the Burst Fade Crop course: how to build the shape with radial sectioning, mark the zero line along light patches, layer the fade in sectors from light to dark shade, and connect the shape to the fade with texturizing shears.


