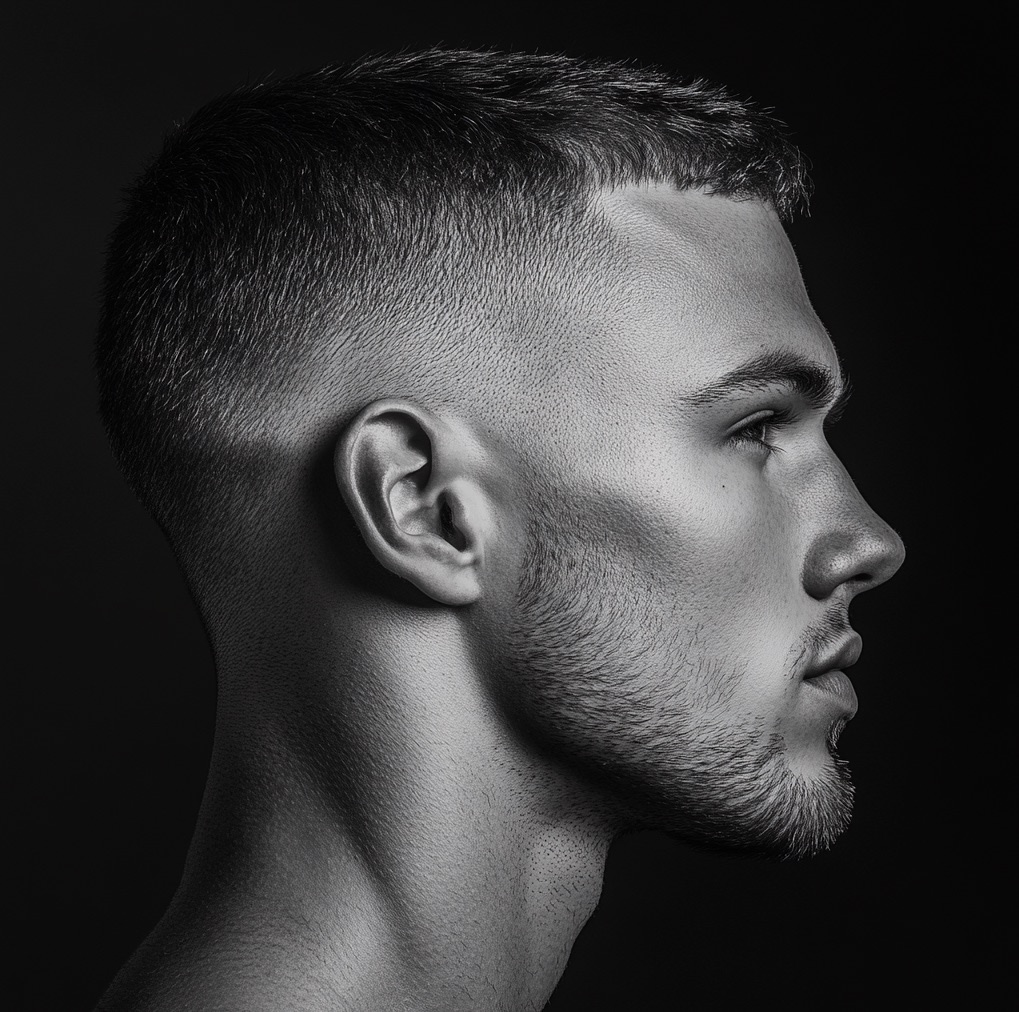
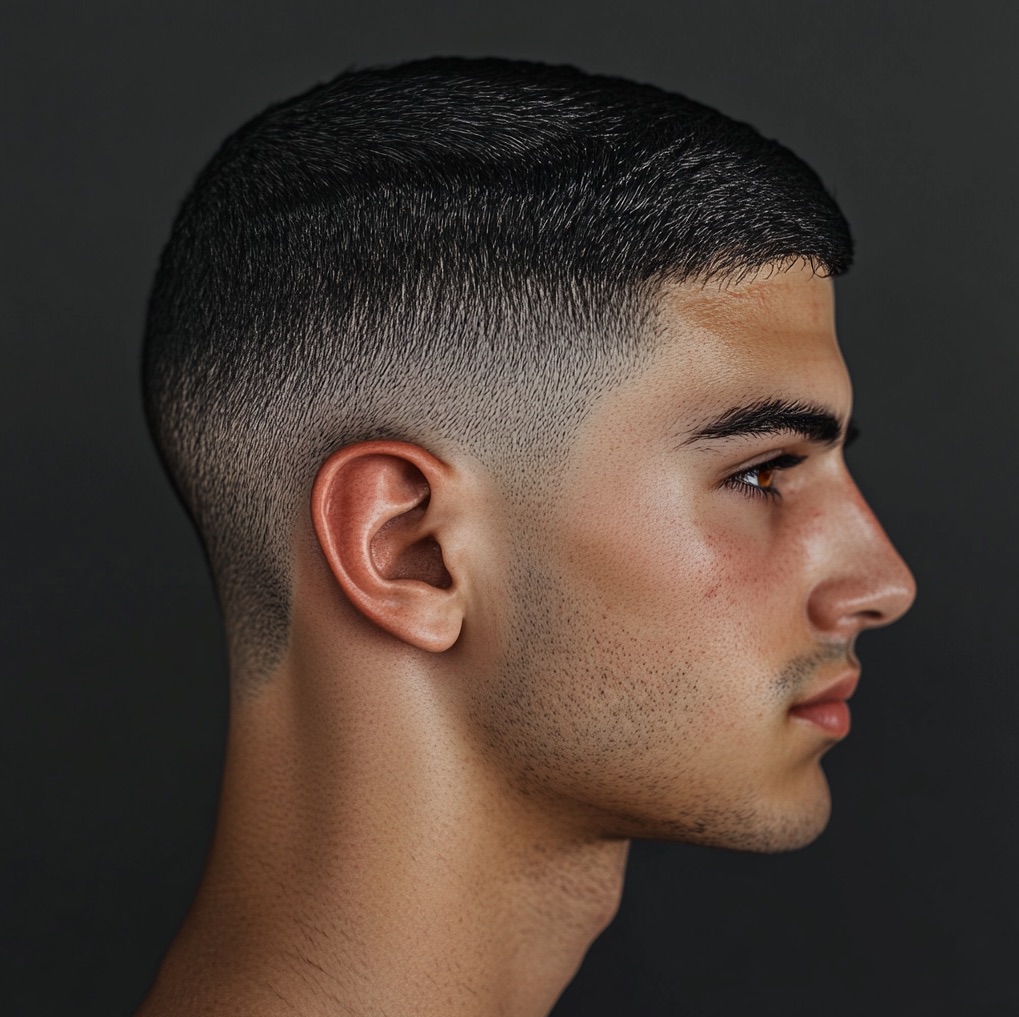
Mid Fade to najbardziej uniwersalne cieniowanie w strzyżeniu męskim. Przejście startuje mniej więcej na wysokości skroni, między linią ucha a kością skroniową, dzięki czemu pasuje do większości kształtów głowy i każdej długości na górze – od krótkiego cropa po pompadour. Poniżej masz pełną procedurę: od ustalenia linii, przez sekcjonowanie i pracę dźwignią maszynki, po blending grzebieniem i nożyczkami. Pisane tak, żeby dało się powtórzyć na fotelu, a nie tylko przeczytać.
Czym jest Mid Fade i kiedy go wybrać
Mid Fade to cieniowanie, w którym przejście od skóry (lub bardzo krótkiego włosa) do dłuższej długości zaczyna się w połowie wysokości boku głowy, w okolicy skroni. To pozycja pośrednia między Low Fade, który startuje nisko nad uchem, a High Fade, który ciągnie się wysoko ku ciemieniu.
Praktyczna różnica jest taka: Mid Fade zostawia więcej masy włosa po bokach niż High Fade, więc optycznie nie zwęża głowy i wybacza nieregularności kształtu czaszki. Sprawdza się przy twarzach okrągłych i kwadratowych, bo nie podnosi wizualnie linii skroni tak agresywnie jak High. Jeśli klient ma odstające uszy albo wgłębienia za skronią, Mid daje pole, żeby je zamaskować długością, czego High Fade już nie pozwala.
Tools needed to perform a Mid Fade
Przed rozpoczęciem pracy przygotuj sprzęt i ustaw stanowisko. Maszynka powinna mieć naładowany akumulator i naoliwione ostrze, a trymer naostrzony – tępe ostrze zostawia linie i wyrywa włos zamiast ciąć.
- Maszynka do strzyżenia z różnymi nasadkami (0.5, 1, 1.5, 2, 3) oraz sprawną dźwignią taper
- Trymer (liner) do wykańczania konturów i czystych linii przy uchu i karku
- Nożyczki fryzjerskie oraz nożyczki degażówki do cieniowania
- Grzebień do fade’a (cienki, z drobnymi zębami) i grzebień szeroki do góry
- Szczotka do zmiatania włosa z karku i ostrza
- Spray for disinfecting tools
- Hair dryer and styling brush
- Styling products (wax, pomade, spray)
For more information on the right tools and how to care for them, see our article How to care for hairdressing tools: A guide for professionals.
Preparing for a haircut
Konsultacja z klientem
- Ustal, gdzie ma startować przejście. Mid Fade ma spore pole, więc dopytaj, czy chce go bliżej ucha (niżej), czy bliżej skroni (wyżej), i pokaż palcem na lustrze gdzie wyznaczysz linię
- Ustal najniższą wartość: skin (do skóry) czy najkrótsza nasadka. To decyduje, ile pracy pójdzie w blending u dołu
- Oceń kształt głowy i twarzy – przy płaskim tyle głowy unikaj wycinania masy za nisko, przy wystającej potylicy daj więcej cienia
- Ustal docelową długość włosów na górze i sposób stylizacji, bo to determinuje proporcję góry do boków
Hair preparation
- Strzyż na sucho lub na lekko wilgotnym włosie. Fade na mokro skraca się po wyschnięciu i kontrola długości jest złudna – mokry włos układa się płasko i ukrywa nierówności
- Przeczesz włosy w kierunku naturalnego wzrostu, żeby zobaczyć realny układ
- Przy bardzo gęstych lub długich bokach podziel je na sekcje i zepnij górę, żeby nie wpadała w strefę fade’a
Hair analysis
- Sprawdź kierunek wzrostu na skroniach i karku – włos często rośnie pod kątem, a maszynka prowadzona pod prąd zbierze inaczej niż z prądem
- Zlokalizuj cowlicki (nieposłuszne kosmyki) i wiry. W tych miejscach zostaw minimalnie więcej długości, bo włos odbije i pokaże dziurę w cieniu
- Oceń gęstość. Włos rzadki szybciej odsłania skórę, więc planuj łagodniejszy start cienia, żeby nie zrobić łysej plamy
Step by step: How to do a Mid Fade
Step 1: Determining the transition line
- Wyznacz punkt środkowy boku głowy, mniej więcej w połowie między górną krawędzią ucha a kością skroniową. To górna granica strefy cieniowania
- Zaznacz tę wysokość po obu stronach symetrycznie – najprościej odnieść ją do stałego punktu, np. górnej krawędzi ucha, żeby obie strony wyszły na tym samym poziomie
- Pamiętaj, że Mid Fade biegnie łukiem wokół głowy, podnosząc się delikatnie ku tyłowi nad uchem – nie prowadź go w poziomej linii prostej
Krok 2: Stworzenie najniższej linii fade’a (guideline)
- Najpierw wybierz całą masę pod linią przejścia jednolitą, krótką długością – to zdejmuje ciężar i daje czysty start. Nasadka #1 lub #1.5 zależnie od ustaleń
- Następnie ustaw najniższą linię (baseline) maszynką bez nasadki lub z nasadką #0 wokół ucha i na karku
- Prowadź maszynkę płasko przy skórze tylko u samego dołu. Tę wartość będziesz potem rozciągać do góry – to twoja najciemniejsza strefa odniesienia
Krok 3: Rozpoczęcie cieniowania od dołu
- Załóż nasadkę #1 i pracuj od dołu ku górze, zatrzymując się około 2-3 cm poniżej zaznaczonej linii przejścia
- Używaj ruchu odgarniającego (flicking) – wjeżdżaj w głąb, a na końcu pociągnięcia odchylaj nadgarstek od głowy, żeby maszynka nie zostawiła ostrej krawędzi, tylko stopniowo wychodziła z włosa
- Pracuj sekcjami zachodzącymi na siebie, prowadząc maszynkę pod kierunek wzrostu włosa. Schodź łukiem, kopiując kształt czaszki, a nie po linii prostej
Krok 4: Tworzenie średniej strefy przejścia
- Zmień na nasadkę #2 (lub #1.5 jako ogniwo pośrednie przy gęstym włosie)
- Pracuj od dołu ku górze, ale tym razem zatrzymuj się wyżej – tuż poniżej linii przejścia. Każda kolejna, dłuższa nasadka ma sięgać wyżej niż poprzednia. Tak buduje się gradient
- Najważniejsza jest strefa styku #1 i #2. Tam wykonuj ruch flicking z mniejszym wgryzem, żeby zatrzeć granicę między dwiema długościami zamiast tworzyć schodek
Krok 5: Blending (zacieranie linii)
- Otwórz dźwignię taper na maszynce i bez nasadki przejedź po widocznych liniach demarkacji. Dźwignia daje długości pośrednie między nasadkami i pozwala dosłownie rozmyć granicę
- Zastosuj clipper-over-comb: prowadź grzebień pod kątem do głowy, a maszynkę po grzbiecie grzebienia. Zmieniając kąt nachylenia grzebienia kontrolujesz, ile włosa zdejmujesz na danej wysokości
- Dopracuj freehand: maszynką bez nasadki, ruchem odgarniającym, wchodź punktowo w miejsca, gdzie wciąż widać przeskok długości. Sprawdzaj efekt pod różnym kątem i przy świetle z boku, które ujawnia linie
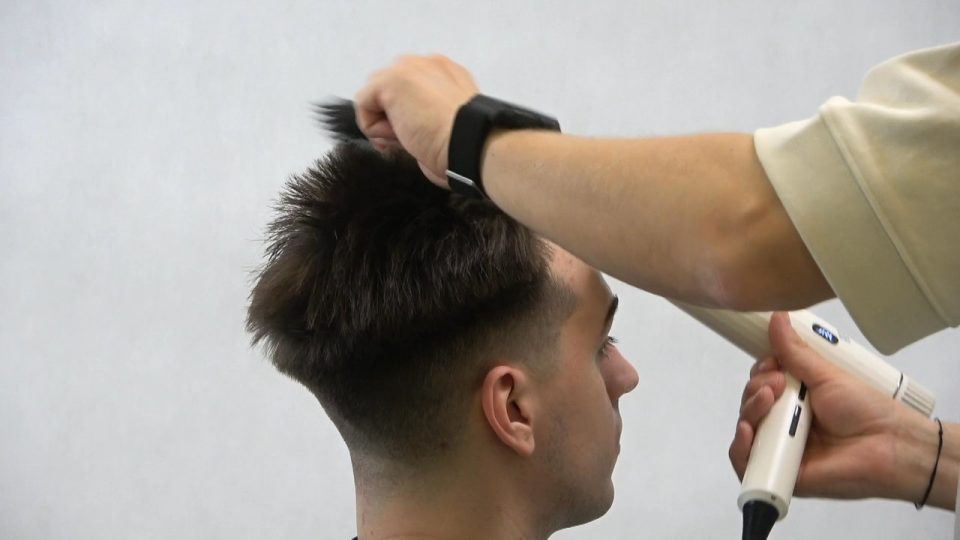
Step 6: The top part of the hairstyle
- Przejdź do góry i strzyż nożyczkami techniką scissor-over-comb lub na uniesionych sekcjach, kontrolując długość przez naciąg na grzebieniu
- Zadbaj o połączenie góry z bokami w strefie skroni. Jeśli góra ma zostać dłuższa, zostaw tam łagodne zejście, żeby nie powstała ostra krawędź ponad fade’em
- Dostosuj długość i styl do preferencji klienta. Dla objętości i ruchu zastosuj techniki teksturowania
Step 7: Finishing the contours
- Trymerem wytnij czysty kontur wokół ucha i na karku. Prowadź ostrze pewną, ciągłą linią – poprawianie tej samej krawędzi kilka razy podnosi linię i robi ją grubą
- Sprawdź symetrię z obu stron, patrząc na klienta od tyłu i porównując wysokość przejścia względem uszu
- Zmieć resztki włosa, zwilż palce lub ostrze i przejedź po fade’ie raz jeszcze pod światło, usuwając pojedyncze odstające włoski i ostatnie nieregularności
Advanced blending techniques
Gdy podstawowy gradient masz opanowany, te techniki dają to, co odróżnia czysty fade od przeciętnego – brak widocznych linii i miękkie przejście, które trzyma się przy odrastaniu.
Praca dźwignią (technika “halfsie”)
- Dźwignia taper tworzy długości pomiędzy standardowymi nasadkami. Ustaw ją w połowie i przejedź strefę styku dwóch nasadek – dostajesz wartość pośrednią, której nasadka nie da. To najszybszy sposób na zlikwidowanie schodka między #1 a #2
Point cutting nożyczkami
- Tnij końcówki pionowo, wbijając czubki nożyczek w pasmo, zamiast ciąć je na płasko. Zmiękcza to twardą krawędź na styku góry z bokami i daje bardziej naturalne przejście niż cięcie prostą linią
Slicing maszynką
- Otwartą maszynką (z odsuniętym ostrzem) ślizgaj się delikatnie po włosie ruchem czesania. Zdejmuje to tylko najdłuższe włoski wystające z gradientu i ujednolica strefę bez wycinania nowej linii
Degażówki (blending shears)
- Nożyczki do cieniowania z rzadkimi zębami wybierają część włosa, zostawiając resztę. Użyj ich w strefie połączenia, żeby rozbić ewentualną pozostałą linię i uzyskać ultra-płynne przejście, zwłaszcza na grubym, prostym włosie
You can learn more about advanced haircutting techniques in our course on modeling volume and shape in men's haircuts.
Styling and finishing
Drying
- Susz włosy w kierunku, w jakim mają się docelowo układać, prowadząc je szczotką lub palcami. To na etapie suszenia ustawiasz objętość u nasady i kierunek pasma
- Na koniec daj chłodny nawiew, żeby utrwalić formę przed nałożeniem produktu
Produkty do stylizacji
- Dobierz produkt do efektu: matowy wosk lub glinka do tekstury i naturalnego wykończenia, pomada do połysku i gładkiego zaczesania
- Rozetrzyj produkt w dłoniach i aplikuj od tyłu głowy ku przodowi, najpierw rozprowadzając na nasadzie, a dopiero potem modelując końcówki – nadmiar na czubku obciąża i spłaszcza fryzurę
Final corrections
- Trymerem dopracuj kontury, jeśli stylizacja odsłoniła jakieś nierówności przy uchu lub karku
- Spryskaj fryzurę lekkim lakierem dla utrwalenia, trzymając go z dystansu, żeby nie skleić włosa
For more styling tips, check out our article How to style men's hair: Tips for clients.
The most common mistakes and how to avoid them
- Widoczne linie demarkacji – przeskok między długościami. Rozwiązanie: wróć do strefy styku dźwignią taper i clipper-over-comb, zacierając granicę ruchem odgarniającym zamiast wycinać nową linię
- Asymetria – jedna strona startuje wyżej. Rozwiązanie: odnoś wysokość przejścia do stałego punktu (krawędź ucha) i sprawdzaj obie strony od tyłu w trakcie pracy, a nie dopiero na końcu
- Niedopasowanie do kształtu głowy – prowadzenie maszynki po linii prostej zamiast łukiem. Rozwiązanie: analizuj strukturę czaszki przed startem i kopiuj jej krzywiznę, dodając cień nad wystającą potylicą
- Fade za wysoki lub za niski – źle odczytane oczekiwanie klienta. Rozwiązanie: dokładnie ustal i pokaż linię przejścia na lustrze przed pierwszym pociągnięciem maszynki
- Łysa plama u dołu – za agresywny start przy rzadkim włosie. Rozwiązanie: przy małej gęstości zacznij cień od dłuższej nasadki i schodź łagodniej, zamiast od razu wchodzić w skórę
Mid Fade Care
Mid Fade traci czystość po 2-3 tygodniach, gdy dół zarasta i gradient się rozmywa. Przekaż klientowi, jak utrzymać efekt między wizytami:
- Odświeżanie co 2-3 tygodnie – sam fade zarasta szybciej niż góra, więc często wystarczy poprawka boków bez ruszania długości na czubku
- Codzienna stylizacja produktem dobranym do typu włosa, żeby utrzymać kierunek nadany przy suszeniu
- Ochrona świeżo ogolonej skóry przed słońcem, zwłaszcza przy starcie do skóry u dołu fade’a
- Nawilżanie skóry głowy dla uniknięcia podrażnień i wrastających włosków w strefie najkrótszego cięcia
You can find detailed care advice in our comprehensive care guide.
Mid Fade Variations
Mid Fade jest na tyle uniwersalny, że dobrze gra z większością form na górze. Najczęstsze kombinacje:
- Mid Fade z teksturowanym cropem – krótka, postrzępiona grzywka z fade’em po bokach, niskie wymagania stylizacyjne
- Mid Fade z pompadourem – objętość i wysokość z przodu, fade podkreśla kontrast góry z bokami
- Mid Fade z quiffem – lżejsza, mniej formalna alternatywa dla pompadoura
- Mid Fade z zaczesaniem na bok – klasyczny, biznesowy układ z wyraźnym przedziałkiem
Zobacz to w praktyce: w kursie kurs Fade z Kacprem Trzaskowskim prześledzisz cały proces krok po kroku na modelu, z komentarzem prowadzącego.
Summary
Czysty Mid Fade sprowadza się do trzech rzeczy: dobrze wyznaczonej i symetrycznej linii przejścia, konsekwentnego budowania gradientu od krótszej do dłuższej nasadki oraz cierpliwego zacierania granic dźwignią, grzebieniem i nożyczkami. Każdy klient ma inny kierunek wzrostu włosa, gęstość i kształt głowy, dlatego startową linię i tempo cienia dopasowujesz indywidualnie.
Jeśli chcesz doskonalić wykonywanie różnych rodzajów fade’ów i innych technik strzyżenia męskiego, zajrzyj do naszych szkoleń fryzjerskich online. Znajdziesz tam kursy, które rozkładają zaawansowane techniki na czynniki pierwsze i pokazują je na realnych modelach.
Chcesz dopracować warsztat przy fotelu? Zobacz kursy fryzjerskie online dla barberów w Akademii Connected Hair.
